
To change a static object in the map to a dynamic one, use the Manage Animations command and apply a simple animation.
You have following possibility to launch Manage Animations command:
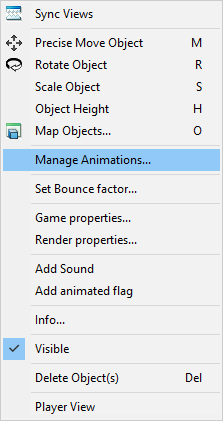
- Hover cursor above the object in the map so, that the object gets highlighted, press right mouse button and from the context menu choose Manage Animations command
Note:
Simple animations allow repeated movement, rotating, flashing, disappearing, breaking of object during the game or combinations of them.
When the Manage Animations command is launched the Animations Manager dialog is opened where you can set animations.
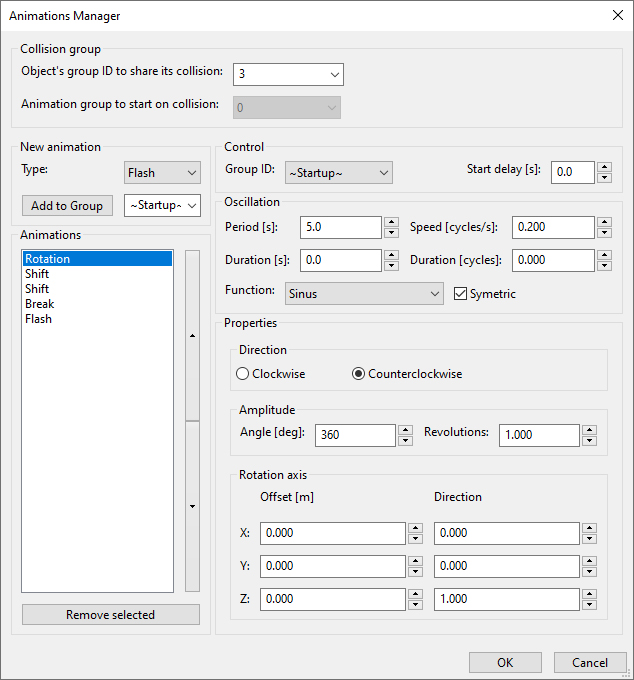
Collision group: defines a group of objects with the same/different animation set, where it’s possible to share the collision of ball between objects.
- Object’s group ID to share its collision – integer identifier defines a group of objects. Set any integer to the edit field and confirm press Enter button. If set integer identifier to value 0, Animation group to start on collision is not available and value of Group ID is only Startup or 0.
- Animation group to start on collision – Enables a domino effect. At first set the New animation properties. Then select an integer identifier to designate a group of one or more objects. The animation of object starts after collision of ball with objects group with same integer that is set in Control – > Group ID. It can be used if the animation at selected object should start after collision of ball with another object (second object should be set with different integer), if the animations are independent, please leave value 0.
New animation: Choose the Type of animation from drop-down menu and set any integer to the edit field under type list and confirm press Enter button. Use Add to Group button to assign animation to object. The assigned animations are listed in Animations list. Use the arrows to change order of animations or to delete animation press Remove selected.
New animation: Choose the Type of animation from drop-down menu and set any integer to the edit field under type list and confirm press Enter button. Use Add to Group button to assign animation to object. The assigned animations are listed in Animations list. Use the arrows to change order of animations or to delete animation press Remove selected. Animations are performed in this order. For example, there is not the same result if object at first rotates and during this rotation shifts, or if the object shifts and during this shifting rotates.
The properties in next part of dialog (Control, Oscillation and Properties) belong to the animation selected in Animations list.
Control: value comes from edit field the New animation
- Group ID: can be used in case of more joined animations which have the same Object’s group ID
- Startup – animation starts immediately after map loading in game.
- 0 – animation starts after collision of ball with object.
- any integer – select one of value from Animation group to start on collision, to start the animation. Animation starts after collision of ball with another object.
- Start delay [s] – the delay after which the animation starts.
Oscillation:
- Period [s] – defines how long one animation cycle lasts.
- Speed [cycles/s] – defines how many times the animation plays per second (except for Break). The Period [s] edit box is recalculated and vice versa.
- Duration [s] – defines how long the animation lasts.
- Duration [cycles] – defines count of animation cycles. The Duration [s] edit box is recalculated and vice versa.
If a non-zero period is set and duration value is 0, the animation repeats over and over.
- Function: defines the smoothness of start and finish the animation.
- Sinus – is set, if the animation should start smoothly
- Square – is set, if the animation should start as step change
- Sawtooth – is set , if the animation consists of an endless sequences joined together
- Symmetric – switch on if the animation should be done symmetrically. For example, shift in one direction and in opposite direction from base position. Note: This causes double speed by the animation.
Properties: The additional properties can be set separately for each animation in dialog, which looks different for each type of animation:
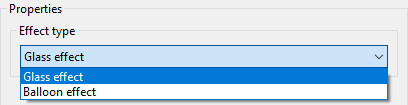
Break:
Effect type: defines the break effect after breaking of object.
- Glass effect if object’s pieces fall down as breaking glass.
- Balloon effect if object’s pieces explode as balloon.
Fade:
Fading type: allows gradual hide or show the object after collision of ball with object
- Fade out – gradual fading out of the object from transparency 100% to the set value Maximum [%]
- Fade in – gradual fading in of the object from transparency 0% to the set value Maximum [%]
Transparency:
- Maximum [%] – the value of the transparency into which the object becomes invisible

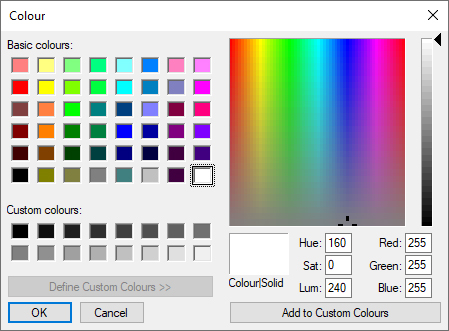
Flash:
• Flash colour – allows select color of object’s flashing after collision of ball with object.
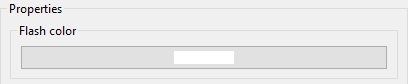
Click on a colour to select basic or custom colour of object flashing.
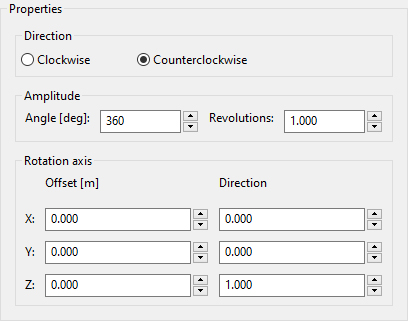
Rotation:
Direction:
- Clockwise – defines default direction of rotation in clockwise.
- Counterclockwise – defines default direction of rotation in counterclockwise.
Amplitude:
- Angle [deg] – defines angle of rotation. The value 360 means full rotation always in one direction.
- Revolutions – defines count of rotation. The Angle [deg] edit box is recalculated and vice versa.
Rotation axis:
- Offset [m] – defines center point of rotation. The 0,0,0 point is insertion point of object.
- Direction – defines axis of rotation. Negative value means opposite direction of rotation. Axes X, Y, Y are axes of object.
Note:
Remember if a non-zero period is set and duration value is 0, the animation repeats over and over.
Note:
If Function from drop down menu is set to Sinus, then the rotation will be performed there and back.
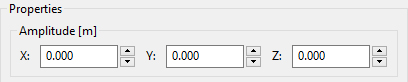
Shift:
- Amplitude – X, Y, Z coordinates define the shift in the direction of the map coordinate system.
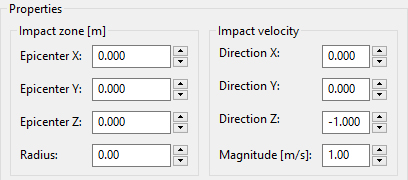
Splash:
This is special animation which can be used only on the object placed on water surface. It is possible to simulate the fall of the ball into the water.
Impact zone [m]: defines imaginary place where the ball will fall.
- Epicenter – X, Y, Z coordinates define the center of Impact zone, it is the relative position from the base point of object.
- Radius – defines radius of Impact zone from the epicenter.
Impact velocity:
- Direction – defines the axis of impact of the ball. Negative value means opposite direction. Axes X, Y, Z are axes of object.
- Magnitude [m/s] – defines velocity of the ball during the impact. Max. value is 100 m/s.
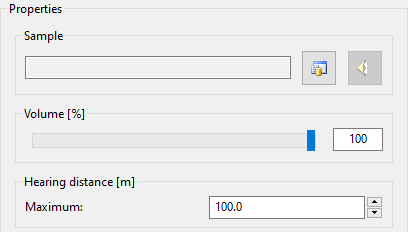
Sound:
This animation allows add the sound to the object after collision of ball with object.
- Sample – Press library icon to select sound from library. The Play Sound and Stop playing Sound buttons can be used to listen the sound.
- Volume [%] – volume of sound in scene.
- Hearing distance [m] – maximal radius where is possible to hear the sound in scene.
Click Ok or press Enter to confirm changes and close Animations Manager dialog.
Note:
It is possible to assign animations only to objects, not to trees.
Hint:
To test animations in editor, click Play icon ![]() from toolbar. In case of Group ID is not set on value Startup, you have to click the object to evoke animation during Play mode.
from toolbar. In case of Group ID is not set on value Startup, you have to click the object to evoke animation during Play mode.