
To create a presentation flight above terrain, use Presentation Curves command.
You have following possibility to launch Presentation Curves command:
- From Presentation drop down menu select Presentation Curves
- Using icon from the toolbar

When Presentation Curves command is launched the Presentation Curves dialog is opened where you can set properties of presentation curve.
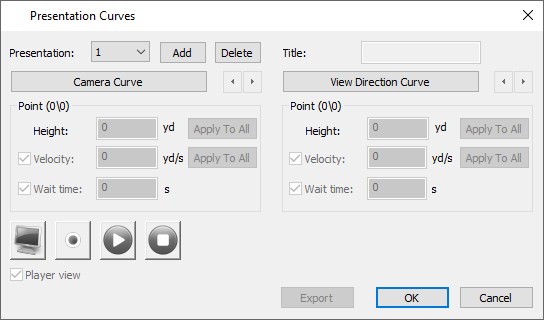
Presentation – Click the arrow at the right side and select the appropriate presentation number from the drop-down list.
Add – create a new presentation.
Delete – remove the current presentation From the Presentation drop down list click on the presentation number you would like to remove. Click the Delete button and presentation curves belonging to presentation with selected number will be deleted from the map.
Title – save a text which will be displayed during the presentation.
Camera Curve and View Direction Curve – For each presentation create the camera curve and the view direction curve. Camera curve defines the camera movement itself during the presentation and the View Direction Curve defines the movement of view direction during the presentation. So, while the camera is moving along the camera curve, camera eye is watching the point which is moving along the view direction curve. The default speed is the same for both. If the view direction curve is shorter than the camera curve, camera eye is watching the end of the view direction curve for the rest of movement. To finish creating the curve choose Finish from right mouse click context menu.
Note:
It is recommended to use top view while creating the curve to easily gain the desired shape of the boundary curve and point positions.
Height, Velocity and Wait time – Use them to define the properties of the grip points of curve. Use arrow buttons < > to select next or previous grip point to change its properties.
The Height is edited as relative height above the terrain. The predefined value for the height of camera curve is 18m/yd. It means the camera flies 18m above the terrain. The predefined value for the view direction curve is 0. It means camera eye is watching the terrain along the view direction curve. After the presentation curve it is finished and saved, the height is saved as absolute height. So, the further modeling of terrain (creating of additional hills or holes) doesn’t affect the presentation curves.
Hint:
Hover cursor over the camera or view direction curve so, that it gets highlighted. From the right mouse click context menu choose Edit Presentation Curve to change again their height.
The Velocity allows to change the predefined speed of camera or speed of the point which is watched by the camera.
If the camera or watched point should stop for some time use the Wait time edit box.
Editing of Velocity and Watch time is not usual therefore use the check box in front of the edit box to edit the value.
Use button Apply to All to assign current Height, Velocity and Wait time values to all curve points.
Play and Stop – Use these buttons to review the created presentation in editor environment ![]()
Hint:
While playing, you can drag slider to move back or forward in the presentation timeline.
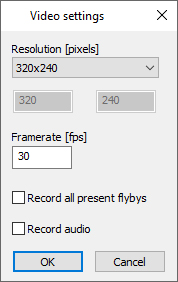
Record – Use this button to save the presentation as a video file ![]()
Resolution [pixels]: From the drop down list select the appropriate video size in pixels.
Framerate [fps]: Set the video framerate.
Record all present flybys: Click the checkbox if you want to record all available presentations.
Record audio: Click the checkbox if you want to record audio.
Note:
Currently is no sound recorded in the .avi file. Another opportunity is to use some external recording program for example Fraps which records concurrently and including the sound but it requires a powerful hardware configuration (CPU and GPU).
In the populated Save As dialog specify file name and location where the video file should be stored. Click Save button to close the dialog.
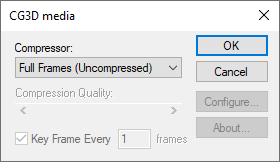
Compressor: From drop down list select the appropriate codec.
If available, set also the desired Compression Quality or click Configure button to see and change the codec properties.
Note:
This dialog is standard Windows dialog which offers all on the computer installed codecs.
Not all of them are working correctly. Selecting some of them can cause the crash of program. Try to play with it a bit in advance to choose the working codec and to define the desired quality (flow).
Click OK button to confirm settings and start the recording.
Note:
While the presentation is recording, you can watch slider movement and a progress value in % at the bottom of Presentation dialog. The recording is sometimes slowly – frame after the frame is generated and saved to the video file. But the advantage of this is that even on the slower machine is possible to generate the fluent video.
After the recording is finished, click Ok or Cancel to close the Presentation dialog.
Full screen – Use this button to play the flyby in full screen mode ![]()
Note:
In a dual displays configuration the full screen mode uses the display which has been set as a primary.